Single Sign-On
Use this guide to configure SAML single sign-on (SSO) with Microsoft Entra ID, Okta, Google Workspace, or another SAML 2.0 identity provider.
Your IT or identity team configures the SAML application. CE Canvas support then registers the identity provider and your organisation’s email domains.
Not the person who manages SSO? Send this guide to your IT or identity team:
https://docs.cecanvas.com/single-sign-on
Availability: SSO is included on selected plans. If Organisation Settings → Authentication says SSO is not on your plan, contact support@cecanvas.com.
Before you start
You need:
- Access to create and configure a SAML application in your identity provider.
- The email domain or domains that will use SSO.
- A test user on one of those domains.
- An Organisation Owner or Admin who can access Organisation Settings → Authentication in CE Canvas.
CE Canvas uses service-provider-initiated SAML. Users start at the CE Canvas sign-in page, enter their work email, and are redirected to your identity provider. Direct identity-provider-initiated SAML launches are not supported.
Setup overview
| Step | Owner | Action |
|---|---|---|
| 1 | Your IT team | Request the CE Canvas SAML values |
| 2 | Your IT team | Create and configure the SAML application |
| 3 | Your IT team | Assign users or groups |
| 4 | Your IT team | Send metadata and domains to CE Canvas |
| 5 | CE Canvas | Register the provider and domains |
| 6 | Both | Verify the provider and test sign-in |
1. Get the CE Canvas SAML values
Contact support@cecanvas.com. CE Canvas support will provide the environment-specific values your identity provider needs:
| SAML field | Value |
|---|---|
| ACS URL / Reply URL / Single sign-on URL | Provided by CE Canvas |
| Entity ID / Audience URI | Provided by CE Canvas |
| Sign-on URL | The CE Canvas sign-in page |
| Default Relay State | Leave blank unless CE Canvas provides a value |
Do not copy values from another CE Canvas environment.
2. Configure the SAML application
Create a SAML 2.0 application for CE Canvas and use these settings:
| Setting | Value |
|---|---|
| ACS URL / Reply URL | The value provided by CE Canvas |
| Entity ID / Audience URI | The value provided by CE Canvas |
| Name ID | User email address |
| Name ID format | Email address |
| Signed assertions | Enable if supported |
| Encrypted assertions | Enable only if agreed with CE Canvas support |
If your identity provider has an application tile or portal, set its Sign-on URL to the CE Canvas sign-in page. The tile must open CE Canvas rather than launch SAML directly. Users will enter their email in CE Canvas to begin SSO.
Microsoft Entra ID
In Microsoft Entra ID, create an Enterprise application, then select Single sign-on → SAML.
Under Basic SAML Configuration, enter:
| Entra field | Value |
|---|---|
| Identifier (Entity ID) | Provided by CE Canvas support |
| Reply URL (Assertion Consumer Service URL) | Provided by CE Canvas support |
| Sign on URL | The CE Canvas sign-in page |
| Relay State | Leave blank unless CE Canvas support provides one |
3. Configure attributes and access
CE Canvas requires a stable email address in the SAML assertion:
| Attribute | Required | Notes |
|---|---|---|
| Yes | Send an explicit email attribute. CE Canvas uses the Name ID only when its format is email address. | |
| Display name | No | Send a full-name attribute if you want CE Canvas to use it as the display name. |
| Groups or app roles | No | Required only for automatic role mapping. |
The returned email domain must exactly match a domain registered for your CE Canvas organisation.
Assign the users or groups that should have CE Canvas access to the application. Do not enable access for the entire directory unless that is intentional.
Optional role mapping
Without role mapping, new SSO users are added as Members.
To map identity-provider groups to CE Canvas roles, send CE Canvas support:
- The SAML group or app-role claim name.
- The value that should map to each CE Canvas role.
For Microsoft Entra ID, prefer app roles or security groups assigned to the CE Canvas application. Use immutable app-role values or group object IDs rather than display names.
Avoid sending all Entra groups. When a user belongs to many groups, Entra can send an overage reference instead of the group values. CE Canvas cannot map a role from that reference, so the user will be added as a Member.
4. Send your configuration to CE Canvas
Send support@cecanvas.com:
| Required item | Notes |
|---|---|
| Identity provider metadata URL | Preferred; includes the entity ID, SSO URL, and signing certificate |
| Metadata XML file | Send this if a metadata URL is unavailable |
| Email domain or domains | For example, example.gov.au |
| Test user | Must be assigned to the SAML application |
Also include the role-mapping values if you configured them.
CE Canvas support will register the identity provider, associate the approved
domains, and enable the provider. Only domains controlled by your organisation
can be registered. Public email domains such as gmail.com and outlook.com
cannot be used.
5. Verify the CE Canvas configuration
An Organisation Owner or Admin can review the configuration in Organisation Settings → Authentication.
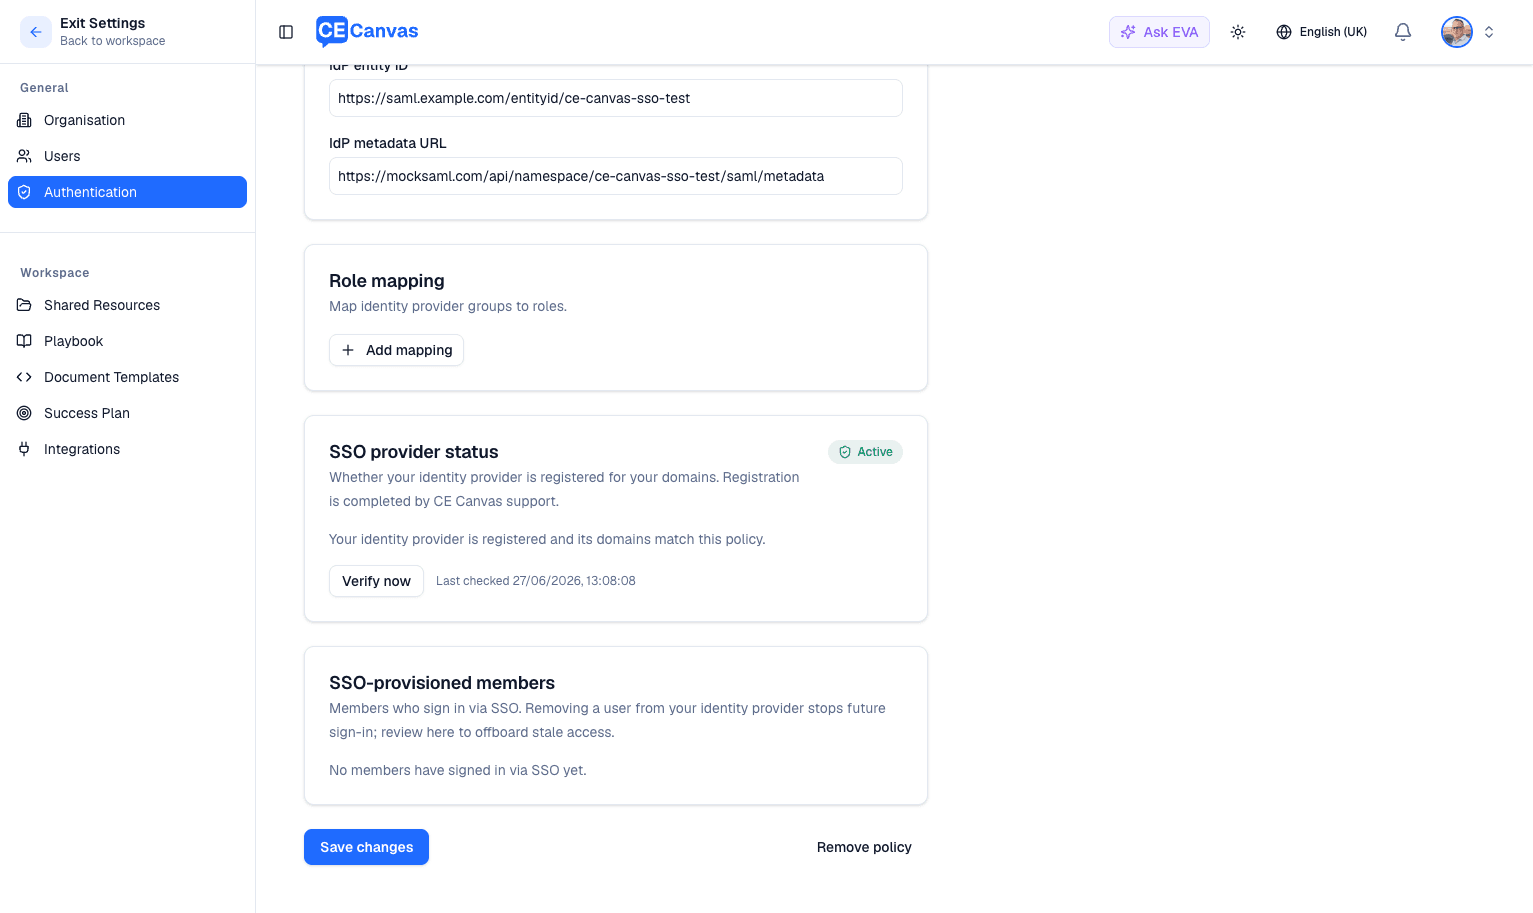
Confirm that:
- The expected email domains are listed.
- Require SSO and the password and magic-link policies match your intended access policy.
- SSO provider status reads Active.
Saving the Authentication policy does not register the identity provider. The provider must be registered by CE Canvas support before SSO will work.
If the status is not Active, select Verify now. Domain mismatch or No provider found means the domains registered by CE Canvas do not match the Authentication settings; contact support. This status check does not validate the signing certificate, so you must still test a login.
6. Test SSO
Use a real test user assigned to the SAML application:
- Go to the CE Canvas sign-in page.
- Enter the test user’s work email address.
- Select Continue with single sign-on.
- Complete authentication with your identity provider.
- Confirm the user reaches the correct CE Canvas organisation.
- Confirm the user has the expected role.
- Confirm a user who is not assigned to the SAML application cannot sign in.
Provisioning and access
| Require SSO | What happens on first sign-in |
|---|---|
| On (recommended) | An assigned user is created in CE Canvas and added to the organisation automatically. No separate invitation is required. |
| Off | SSO verifies the user’s identity, but the user must already have been added or invited to the organisation. |
Without role mapping, automatically provisioned users become Members. Organisation Owners and Admins can then add them to projects. With role mapping, the highest-privilege matching value sets the user’s organisation role.
Removing a user from the identity provider application prevents future SSO sign-ins, but does not end an existing CE Canvas session immediately. For immediate removal, also remove the member in CE Canvas. The Authentication page lists SSO-provisioned members and their last SSO sign-in.
Troubleshooting
| Problem | What to check |
|---|---|
| No single sign-on is configured for that email domain | Confirm the email domain is listed in CE Canvas and the provider status is Active. |
| The identity provider rejects the login | Confirm the user is assigned to the SAML application. |
| The user returns to the login page after authentication | Confirm the Reply URL / ACS URL exactly matches the value from CE Canvas. |
| The user signs in but sees no organisation | Confirm the SAML email uses the registered domain and Require SSO provisioning is enabled, or invite the user if it is disabled. |
| The user receives the wrong role | Review the group or app-role claim and the CE Canvas role mapping. |
| Password or magic-link login is still available | Review the sign-in policies under Organisation Settings → Authentication. |
| An identity-provider tile fails | Set its Sign-on URL to the CE Canvas sign-in page; do not use a direct SAML launch. |
Certificate rotation
Contact CE Canvas support before rotating a signing certificate or replacing a metadata URL.
- Create the new certificate and keep the old certificate active during an overlap period.
- Ask CE Canvas support to update the metadata.
- Complete a successful test sign-in.
- Deactivate the old certificate.